每过几天就去看看OpenCV.org的更新,今天突然发现了一个有趣的东西。http://opencv.org/mastering-opencv-with-practical-computer-vision-projects.html。弄OpenCV的人出版了一个Mastering OpenCV with Practical Computer Vision Projects的书,也就是用OpenCV开发的一切有意思的项目。
使用OpenCV开发机器视觉项目
有以下9个章节
Chapters:
- Ch1) Cartoonifier and Skin Changer for Android, by Shervin Emami.
- Ch2) Marker-based Augmented Reality on iPhone or iPad, by Khvedchenia Ievgen.
- Ch3) Marker-less Augmented Reality, by Khvedchenia Ievgen.
- Ch4) Exploring Structure from Motion using OpenCV, by Roy Shilkrot.
- Ch5) Number Plate Recognition using SVM and Neural Networks, by David Escrivá.
- Ch6) Non-rigid Face Tracking, by Jason Saragih.
- Ch7) 3D Head Pose Estimation using AAM and POSIT, by Daniel Lélis Baggio.
- Ch8) Face Recognition using Eigenfaces or Fisherfaces, by Shervin Emami.
- Ch9) Developing Fluid Wall using the Microsoft Kinect, by Naureen Mahmood.
- Per-chapter Requirements:
- Ch1: webcam (for desktop app), or Android development system (for Android app).
- Ch2: iOS development system (to build an iOS app).
- Ch3: OpenGL built into OpenCV.
- Ch4: PCL (http://pointclouds.org/) and SSBA (http://www.inf.ethz.ch/personal/chzach/opensource.html).
- Ch5: nothing.
- Ch6: nothing, but requires training data for execution.
- Ch7: nothing.
- Ch8: webcam.
- Ch9: Kinect depth sensor.
Screenshots:
- Ch1) Cartoonifier and Skin Changer for Android:

- Ch2) Marker-based Augmented Reality on iPhone or iPad:

- Ch3) Marker-less Augmented Reality:

- Ch4) Exploring Structure from Motion using OpenCV:

- Ch5) Number Plate Recognition using SVM and Neural Networks:

- Ch6) Non-rigid Face Tracking:

- Ch7) 3D Head Pose Estimation using AAM and POSIT:

- Ch8) Face Recognition using Eigenfaces or Fisherfaces:

- Ch9) Developing Fluid Wall using the Microsoft Kinect:

看看,他们确实涵盖了当今最热门的一些机器视觉相关项目,其中包括我喜欢的Kinect,甚至我熟悉的人脸识别、人脸跟踪、人脸朝向估计等等(这么多关于人脸的!),还包括虚拟现实之类技术,有时间也得看看。这本书可以买纸质版也可以买电子版,购买地址 PacktPub。好吧,估计一般人是买不到的,国外的书果然不便宜,$44.99
不过书中配套的项目源码倒是都有的!https://github.com/MasteringOpenCV/code
第一个项目:卡通画和肤色变化初探
我在windows上尝试编译了第一个例子(他既有android平台的代码也给出了PC平台的)。以下是截图:
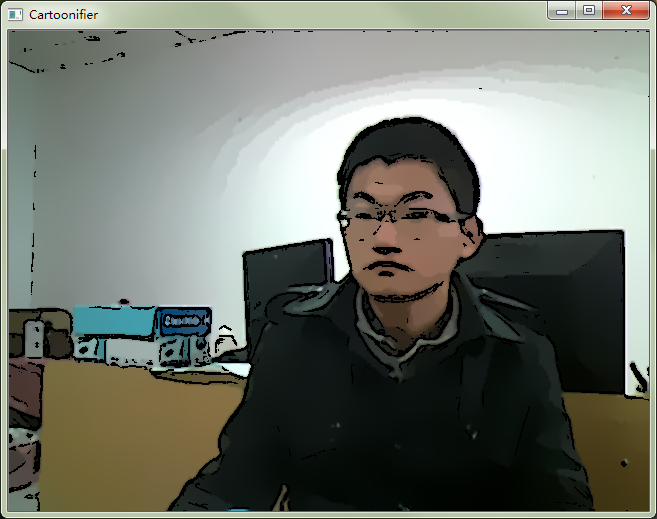
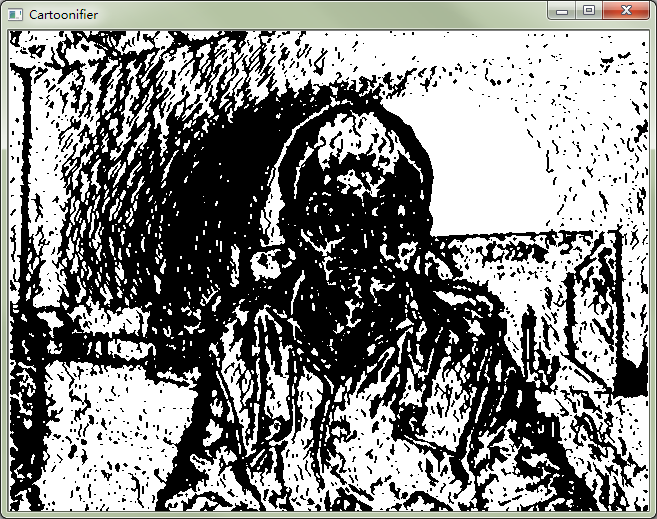
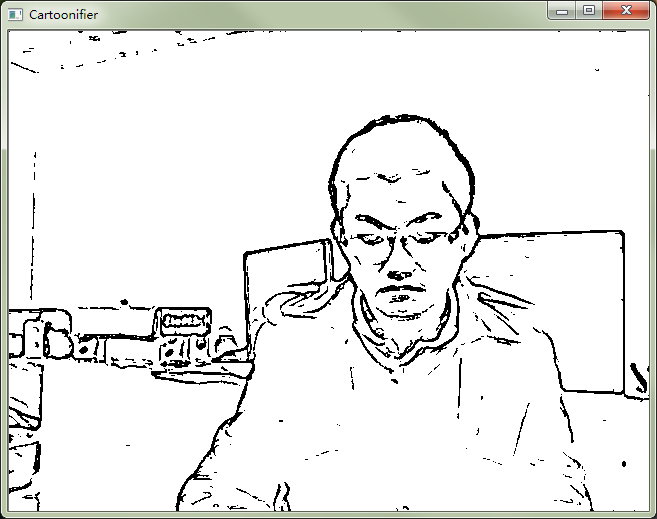
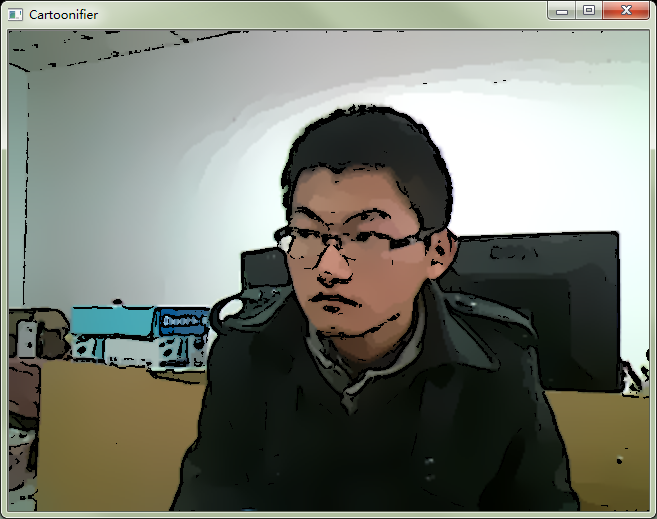
第一张和第四张图片都是卡通图,第2张是evil状态的,所以有点惨不忍睹吧,第三张是素描。具体算法我还未去细读,给出下载第一个项目的VS2010地址。通过debug可以编译出可用的exe,而release尽然无法检测到摄像头以致exe无法运行,编译时注意。
给出主要的卡通画函数实现代码:
|
1 2 3 4 5 6 7 8 9 10 11 12 13 14 15 16 17 18 19 20 21 22 23 24 25 26 27 28 29 30 31 32 33 34 35 36 37 38 39 40 41 42 43 44 45 46 47 48 49 50 51 52 53 54 55 56 57 58 59 60 61 62 63 64 65 66 67 68 69 70 71 72 73 74 75 76 77 78 79 80 81 82 83 84 85 86 87 88 89 90 91 92 93 94 95 96 97 98 99 100 101 102 103 104 105 106 107 108 109 110 111 112 113 114 115 116 117 118 119 120 121 122 123 124 125 126 127 128 129 130 131 132 133 134 135 136 137 138 139 140 141 142 143 144 145 146 147 148 149 150 151 152 153 154 155 156 157 158 159 160 161 162 163 164 165 166 167 168 169 170 171 172 173 174 175 176 177 178 179 180 181 182 183 184 185 186 187 188 189 190 191 192 193 194 195 196 197 198 199 200 201 202 203 204 205 206 207 208 209 210 211 212 213 214 215 216 217 218 219 220 221 222 223 224 225 226 227 228 229 230 231 232 233 234 235 236 237 238 239 240 241 242 243 244 245 246 247 248 249 250 251 252 253 254 255 256 257 258 259 260 261 262 263 264 265 266 267 268 269 270 271 272 273 274 275 276 277 278 279 |
/***************************************************************************** * cartoon.cpp * Create a cartoon-like or painting-like image filter. ****************************************************************************** * by Shervin Emami, 5th Dec 2012 (shervin.emami@gmail.com) * http://www.shervinemami.info/ ****************************************************************************** * Ch1 of the book "Mastering OpenCV with Practical Computer Vision Projects" * Copyright Packt Publishing 2012. * http://www.packtpub.com/cool-projects-with-opencv/book *****************************************************************************/ #include "cartoon.h" #include "ImageUtils.h" // Handy functions for debugging OpenCV images, by Shervin Emami. // Convert the given photo into a cartoon-like or painting-like image. // Set sketchMode to true if you want a line drawing instead of a painting. // Set alienMode to true if you want alien skin instead of human. // Set evilMode to true if you want an "evil" character instead of a "good" character. // Set debugType to 1 to show where skin color is taken from, and 2 to show the skin mask in a new window (for desktop). void cartoonifyImage(Mat srcColor, Mat dst, bool sketchMode, bool alienMode, bool evilMode, int debugType) { // Convert from BGR color to Grayscale Mat srcGray; cvtColor(srcColor, srcGray, CV_BGR2GRAY); // Remove the pixel noise with a good Median filter, before we start detecting edges. medianBlur(srcGray, srcGray, 7); Size size = srcColor.size(); Mat mask = Mat(size, CV_8U); Mat edges = Mat(size, CV_8U); if (!evilMode) { // Generate a nice edge mask, similar to a pencil line drawing. Laplacian(srcGray, edges, CV_8U, 5); threshold(edges, mask, 80, 255, THRESH_BINARY_INV); // Mobile cameras usually have lots of noise, so remove small // dots of black noise from the black & white edge mask. removePepperNoise(mask); } else { // Evil mode, making everything look like a scary bad guy. // (Where "srcGray" is the original grayscale image plus a medianBlur of size 7x7). Mat edges2; Scharr(srcGray, edges, CV_8U, 1, 0); Scharr(srcGray, edges2, CV_8U, 1, 0, -1); edges += edges2; threshold(edges, mask, 12, 255, THRESH_BINARY_INV); medianBlur(mask, mask, 3); } //imshow("edges", edges); //imshow("mask", mask); // For sketch mode, we just need the mask! if (sketchMode) { // The output image has 3 channels, not a single channel. cvtColor(mask, dst, CV_GRAY2BGR); return; } // Do the bilateral filtering at a shrunken scale, since it // runs so slowly but doesn't need full resolution for a good effect. Size smallSize; smallSize.width = size.width/2; smallSize.height = size.height/2; Mat smallImg = Mat(smallSize, CV_8UC3); resize(srcColor, smallImg, smallSize, 0,0, INTER_LINEAR); // Perform many iterations of weak bilateral filtering, to enhance the edges // while blurring the flat regions, like a cartoon. Mat tmp = Mat(smallSize, CV_8UC3); int repetitions = 7; // Repetitions for strong cartoon effect. for (int i=0; i<repetitions; i++) { int size = 9; // Filter size. Has a large effect on speed. double sigmaColor = 9; // Filter color strength. double sigmaSpace = 7; // Positional strength. Effects speed. bilateralFilter(smallImg, tmp, size, sigmaColor, sigmaSpace); bilateralFilter(tmp, smallImg, size, sigmaColor, sigmaSpace); } if (alienMode) { // Apply an "alien" filter, when given a shrunken image and the full-res edge mask. // Detects the color of the pixels in the middle of the image, then changes the color of that region to green. changeFacialSkinColor(smallImg, edges, debugType); } // Go back to the original scale. resize(smallImg, srcColor, size, 0,0, INTER_LINEAR); // Clear the output image to black, so that the cartoon line drawings will be black (ie: not drawn). memset((char*)dst.data, 0, dst.step * dst.rows); // Use the blurry cartoon image, except for the strong edges that we will leave black. srcColor.copyTo(dst, mask); } // Apply an "alien" filter, when given a shrunken BGR image and the full-res edge mask. // Detects the color of the pixels in the middle of the image, then changes the color of that region to green. void changeFacialSkinColor(Mat smallImgBGR, Mat bigEdges, int debugType) { // Convert to Y'CrCb color-space, since it is better for skin detection and color adjustment. Mat yuv = Mat(smallImgBGR.size(), CV_8UC3); cvtColor(smallImgBGR, yuv, CV_BGR2YCrCb); // The floodFill mask has to be 2 pixels wider and 2 pixels taller than the small image. // The edge mask is the full src image size, so we will shrink it to the small size, // storing into the floodFill mask data. int sw = smallImgBGR.cols; int sh = smallImgBGR.rows; Mat maskPlusBorder = Mat::zeros(sh+2, sw+2, CV_8U); Mat mask = maskPlusBorder(Rect(1,1,sw,sh)); // mask is a ROI in maskPlusBorder. resize(bigEdges, mask, smallImgBGR.size()); // Make the mask values just 0 or 255, to remove weak edges. threshold(mask, mask, 80, 255, THRESH_BINARY); // Connect the edges together, if there was a pixel gap between them. dilate(mask, mask, Mat()); erode(mask, mask, Mat()); //imshow("constraints for floodFill", mask); // YCrCb Skin detector and color changer using multiple flood fills into a mask. // Apply flood fill on many points around the face, to cover different shades & colors of the face. // Note that these values are dependent on the face outline, drawn in drawFaceStickFigure(). int const NUM_SKIN_POINTS = 6; Point skinPts[NUM_SKIN_POINTS]; skinPts[0] = Point(sw/2, sh/2 - sh/6); skinPts[1] = Point(sw/2 - sw/11, sh/2 - sh/6); skinPts[2] = Point(sw/2 + sw/11, sh/2 - sh/6); skinPts[3] = Point(sw/2, sh/2 + sh/16); skinPts[4] = Point(sw/2 - sw/9, sh/2 + sh/16); skinPts[5] = Point(sw/2 + sw/9, sh/2 + sh/16); // Skin might be fairly dark, or slightly less colorful. // Skin might be very bright, or slightly more colorful but not much more blue. const int LOWER_Y = 60; const int UPPER_Y = 80; const int LOWER_Cr = 25; const int UPPER_Cr = 15; const int LOWER_Cb = 20; const int UPPER_Cb = 15; Scalar lowerDiff = Scalar(LOWER_Y, LOWER_Cr, LOWER_Cb); Scalar upperDiff = Scalar(UPPER_Y, UPPER_Cr, UPPER_Cb); // Instead of drawing into the "yuv" image, just draw 1's into the "maskPlusBorder" image, so we can apply it later. // The "maskPlusBorder" is initialized with the edges, because floodFill() will not go across non-zero mask pixels. Mat edgeMask = mask.clone(); // Keep an duplicate copy of the edge mask. for (int i=0; i<NUM_SKIN_POINTS; i++) { // Use the floodFill() mode that stores to an external mask, instead of the input image. const int flags = 4 | FLOODFILL_FIXED_RANGE | FLOODFILL_MASK_ONLY; floodFill(yuv, maskPlusBorder, skinPts[i], Scalar(), NULL, lowerDiff, upperDiff, flags); if (debugType >= 1) circle(smallImgBGR, skinPts[i], 5, CV_RGB(0, 0, 255), 1, CV_AA); } if (debugType >= 2) imshow("flood mask", mask*120); // Draw the edges as white and the skin region as grey. // After the flood fill, "mask" contains both edges and skin pixels, whereas // "edgeMask" just contains edges. So to get just the skin pixels, we can remove the edges from it. mask -= edgeMask; // "mask" now just contains 1's in the skin pixels and 0's for non-skin pixels. // Change the color of the skin pixels in the given BGR image. int Red = 0; int Green = 70; int Blue = 0; add(smallImgBGR, Scalar(Blue, Green, Red), smallImgBGR, mask); } // Remove black dots (upto 4x4 in size) of noise from a pure black & white image. // ie: The input image should be mostly white (255) and just contains some black (0) noise // in addition to the black (0) edges. void removePepperNoise(Mat &mask) { // For simplicity, ignore the top & bottom row border. for (int y=2; y<mask.rows-2; y++) { // Get access to each of the 5 rows near this pixel. uchar *pThis = mask.ptr(y); uchar *pUp1 = mask.ptr(y-1); uchar *pUp2 = mask.ptr(y-2); uchar *pDown1 = mask.ptr(y+1); uchar *pDown2 = mask.ptr(y+2); // For simplicity, ignore the left & right row border. pThis += 2; pUp1 += 2; pUp2 += 2; pDown1 += 2; pDown2 += 2; for (int x=2; x<mask.cols-2; x++) { uchar v = *pThis; // Get the current pixel value (either 0 or 255). // If the current pixel is black, but all the pixels on the 2-pixel-radius-border are white // (ie: it is a small island of black pixels, surrounded by white), then delete that island. if (v == 0) { bool allAbove = *(pUp2 - 2) && *(pUp2 - 1) && *(pUp2) && *(pUp2 + 1) && *(pUp2 + 2); bool allLeft = *(pUp1 - 2) && *(pThis - 2) && *(pDown1 - 2); bool allBelow = *(pDown2 - 2) && *(pDown2 - 1) && *(pDown2) && *(pDown2 + 1) && *(pDown2 + 2); bool allRight = *(pUp1 + 2) && *(pThis + 2) && *(pDown1 + 2); bool surroundings = allAbove && allLeft && allBelow && allRight; if (surroundings == true) { // Fill the whole 5x5 block as white. Since we know the 5x5 borders // are already white, just need to fill the 3x3 inner region. *(pUp1 - 1) = 255; *(pUp1 + 0) = 255; *(pUp1 + 1) = 255; *(pThis - 1) = 255; *(pThis + 0) = 255; *(pThis + 1) = 255; *(pDown1 - 1) = 255; *(pDown1 + 0) = 255; *(pDown1 + 1) = 255; } // Since we just covered the whole 5x5 block with white, we know the next 2 pixels // won't be black, so skip the next 2 pixels on the right. pThis += 2; pUp1 += 2; pUp2 += 2; pDown1 += 2; pDown2 += 2; } // Move to the next pixel. pThis++; pUp1++; pUp2++; pDown1++; pDown2++; } } } // Draw an anti-aliased face outline, so the user knows where to put their face. // Note that the skin detector for "alien" mode uses points around the face based on the face // dimensions shown by this function. void drawFaceStickFigure(Mat dst) { Size size = dst.size(); int sw = size.width; int sh = size.height; // Draw the face onto a color image with black background. Mat faceOutline = Mat::zeros(size, CV_8UC3); Scalar color = CV_RGB(255,255,0); // Yellow int thickness = 4; // Use 70% of the screen height as the face height. int faceH = sh/2 * 70/100; // "faceH" is actually half the face height (ie: radius of the ellipse). // Scale the width to be the same nice shape for any screen width (based on screen height). int faceW = faceH * 72/100; // Use a face with an aspect ratio of 0.72 // Draw the face outline. ellipse(faceOutline, Point(sw/2, sh/2), Size(faceW, faceH), 0, 0, 360, color, thickness, CV_AA); // Draw the eye outlines, as 2 half ellipses. int eyeW = faceW * 23/100; int eyeH = faceH * 11/100; int eyeX = faceW * 48/100; int eyeY = faceH * 13/100; // Set the angle and shift for the eye half ellipses. int eyeA = 15; // angle in degrees. int eyeYshift = 11; // Draw the top of the right eye. ellipse(faceOutline, Point(sw/2 - eyeX, sh/2 - eyeY), Size(eyeW, eyeH), 0, 180+eyeA, 360-eyeA, color, thickness, CV_AA); // Draw the bottom of the right eye. ellipse(faceOutline, Point(sw/2 - eyeX, sh/2 - eyeY - eyeYshift), Size(eyeW, eyeH), 0, 0+eyeA, 180-eyeA, color, thickness, CV_AA); // Draw the top of the left eye. ellipse(faceOutline, Point(sw/2 + eyeX, sh/2 - eyeY), Size(eyeW, eyeH), 0, 180+eyeA, 360-eyeA, color, thickness, CV_AA); // Draw the bottom of the left eye. ellipse(faceOutline, Point(sw/2 + eyeX, sh/2 - eyeY - eyeYshift), Size(eyeW, eyeH), 0, 0+eyeA, 180-eyeA, color, thickness, CV_AA); // Draw the bottom lip of the mouth. int mouthY = faceH * 53/100; int mouthW = faceW * 45/100; int mouthH = faceH * 6/100; ellipse(faceOutline, Point(sw/2, sh/2 + mouthY), Size(mouthW, mouthH), 0, 0, 180, color, thickness, CV_AA); // Draw anti-aliased text. int fontFace = FONT_HERSHEY_COMPLEX; float fontScale = 1.0f; int fontThickness = 2; putText(faceOutline, "Put your face here", Point(sw * 23/100, sh * 10/100), fontFace, fontScale, color, fontThickness, CV_AA); //imshow("faceOutline", faceOutline); // Overlay the outline with alpha blending. addWeighted(dst, 1.0, faceOutline, 0.7, 0, dst, CV_8UC3); } |
这些项目有趣,并且十分实用,很可能进而在其基础上开发更多十分有趣的项目。希望更多的人来研读这些代码,并作分享。
 小明编程
小明编程


![[转]CVPR 2015 OpenCV 3.0 tutorial!-小明编程](https://brightguo.com/wp-content/uploads/2015/06/OpenCV-Tutorial-CVPR-2015-0-195x150.png)


