要做个检测圆的程序,除了传统hough方法,还以用这个blob检测算法,听别人说这个算法就是检测“一坨东西”用的。不得不说最后一个图真好,我再opencv官方文档都找不到这么好的图,也没有什么教程,唯有这篇文章如此详细告诉我怎么用。特别要注意,默认检测黑色点,如果要检测白色的点请设置bycolor为true,并且color数值是255.
下段文字内容参考自:http://doc.okbase.net/ronny/archive/102540.html
斑点通常是指与周围有着颜色和灰度差别的区域。在实际地图中,往往存在着大量这样的斑点,如一颗树是一个斑点,一块草地是一个斑点,一栋房子也可以是一个斑点。由于斑点代表的是一个区域,相比单纯的角点,它的稳定性要好,抗噪声能力要强,所以它在图像配准上扮演了很重要的角色。
同时有时图像中的斑点也是我们关心的区域,比如在医学与生物领域,我们需要从一些X光照片或细胞显微照片中提取一些具有特殊意义的斑点的位置或数量。
比如下图中天空的飞机、向日葵的花盘、X线断层图像中的两个斑点。
还有一篇文章介绍背后的算法,blob特征检测原理与实现 abcd1992719g
This tutorial explains simple blob detection using OpenCV.
What is a Blob ?
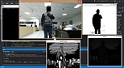
A Blob is a group of connected pixels in an image that share some common property ( E.g grayscale value ). In the image above, the dark connected regions are blobs, and the goal of blob detection is to identify and mark these regions.
SimpleBlobDetector Example
OpenCV provides a convenient way to detect blobs and filter them based on different characteristics. Let’s start with the simplest example
Python
|
1
2
3
4
5
6
7
8
9
10
11
12
13
14
15
16
17
18
19
20
|
# Standard importsimport cv2import numpy as np;# Read imageim = cv2.imread("blob.jpg", cv2.IMREAD_GRAYSCALE)# Set up the detector with default parameters.detector = cv2.SimpleBlobDetector()# Detect blobs.keypoints = detector.detect(im)# Draw detected blobs as red circles.# cv2.DRAW_MATCHES_FLAGS_DRAW_RICH_KEYPOINTS ensures the size of the circle corresponds to the size of blobim_with_keypoints = cv2.drawKeypoints(im, keypoints, np.array([]), (0,0,255), cv2.DRAW_MATCHES_FLAGS_DRAW_RICH_KEYPOINTS)# Show keypointscv2.imshow("Keypoints", im_with_keypoints)cv2.waitKey(0) |
C++
|
1
2
3
4
5
6
7
8
9
10
11
12
13
14
15
16
17
18
19
|
using namespace cv;// Read imageMat im = imread( "blob.jpg", IMREAD_GRAYSCALE );// Set up the detector with default parameters.SimpleBlobDetector detector;// Detect blobs.std::vector<KeyPoint> keypoints;detector.detect( im, keypoints);// Draw detected blobs as red circles.// DrawMatchesFlags::DRAW_RICH_KEYPOINTS flag ensures the size of the circle corresponds to the size of blobMat im_with_keypoints;drawKeypoints( im, keypoints, im_with_keypoints, Scalar(0,0,255), DrawMatchesFlags::DRAW_RICH_KEYPOINTS );// Show blobsimshow("keypoints", im_with_keypoints );waitKey(0); |
How does Blob detection work ?
SimpleBlobDetector, as the name implies, is based on a rather simple algorithm described below. The algorithm is controlled by parameters ( shown in bold below ) and has the following steps. Scroll down to know how the parameters are set.
- Thresholding : Convert the source images to several binary images by thresholding the source image with thresholds starting at minThreshold. These thresholds are incremented by thresholdStep until maxThreshold. So the first threshold is minThreshold, the second is minThreshold + thresholdStep, the third is minThreshold + 2 x thresholdStep, and so on.
- Grouping : In each binary image, connected white pixels are grouped together. Let’s call these binary blobs.
- Merging : The centers of the binary blobs in the binary images are computed, and blobs located closer than minDistBetweenBlobs are merged.
- Center & Radius Calculation : The centers and radii of the new merged blobs are computed and returned.
Filtering Blobs by Color, Size and Shape
The parameters for SimpleBlobDetector can be set to filter the type of blobs we want.
- By Color : [ Note : This feature appears to be broken. I checked the code, and it appears to have a logical error ] First you need to set filterByColor = 1. Set blobColor = 0 to select darker blobs, and blobColor = 255 for lighter blobs.
- By Size : You can filter the blobs based on size by setting the parametersfilterByArea = 1, and appropriate values for minArea and maxArea. E.g. setting minArea = 100 will filter out all the blobs that have less then 100 pixels.
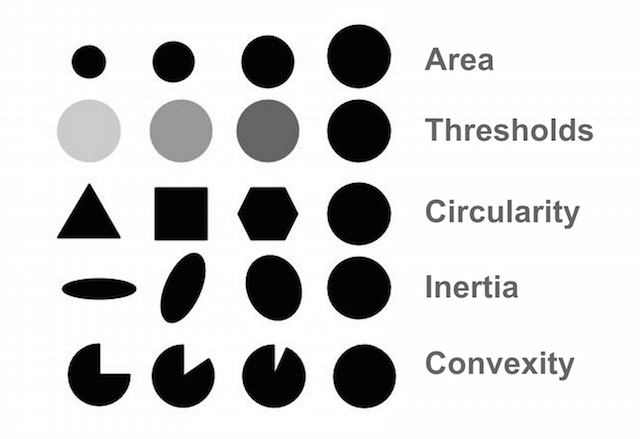
- By Shape : Now shape has three different parameters.
- Circularity : This just measures how close to a circle the blob is. E.g. a regular hexagon has higher circularity than say a square. To filter by circularity, set filterByCircularity = 1. Then set appropriate values forminCircularity and maxCircularity. Circularity is defined as (
 ). This means that a circle has a circularity of 1, circularity of a square is 0.785, and so on.
 - Convexity : A picture is worth a thousand words. Convexity is defined as the (Area of the Blob / Area of it’s convex hull). Now, Convex Hull of a shape is the tightest convex shape that completely encloses the shape. To filter by convexity, set filterByConvexity = 1, followed by setting 0 ≤ minConvexity≤ 1 and maxConvexity ( ≤ 1)

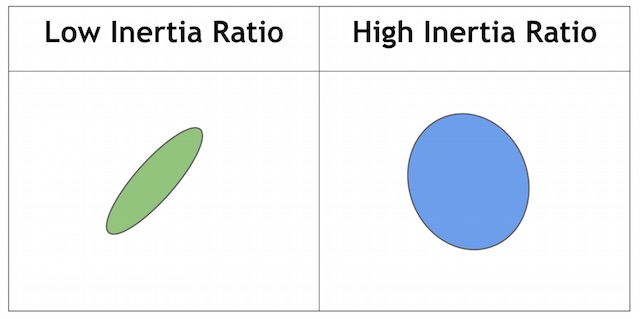
- Inertia Ratio : Don’t let this scare you. Mathematicians often use confusing words to describe something very simple. All you have to know is that this measures how elongated a shape is. E.g. for a circle, this value is 1, for an ellipse it is between 0 and 1, and for a line it is 0. To filter by inertia ratio, set filterByInertia = 1, and set 0 ≤ minInertiaRatio ≤ 1 and maxInertiaRatio (≤ 1 ) appropriately.
- Circularity : This just measures how close to a circle the blob is. E.g. a regular hexagon has higher circularity than say a square. To filter by circularity, set filterByCircularity = 1. Then set appropriate values forminCircularity and maxCircularity. Circularity is defined as (
How to set SimpleBlobDetector params ?
Setting parameters for SimpleBlobDetector is easy. Here is an example
Python
|
1
2
3
4
5
6
7
8
9
10
11
12
13
14
15
16
17
18
19
20
21
22
23
24
25
26
27
28
29
|
# Setup SimpleBlobDetector parameters.params = cv2.SimpleBlobDetector_Params()# Change thresholdsparams.minThreshold = 10;params.maxThreshold = 200;# Filter by Area.params.filterByArea = Trueparams.minArea = 1500# Filter by Circularityparams.filterByCircularity = Trueparams.minCircularity = 0.1# Filter by Convexityparams.filterByConvexity = Trueparams.minConvexity = 0.87# Filter by Inertiaparams.filterByInertia = Trueparams.minInertiaRatio = 0.01# Create a detector with the parametersver = (cv2.__version__).split('.')if int(ver[0]) < 3 : detector = cv2.SimpleBlobDetector(params)else : detector = cv2.SimpleBlobDetector_create(params) |
C++
Setting of params for SimpleBlobDetector in OpenCV 2 is slightly different from OpenCV 3. In the code below we use the macro CV_MAJOR_VERSION to detect the version of OpenCV. In OpenCV 3, the SimpleBlobDetector::create method is used to create a smart pointer. The usage is shown in the code below.
|
1
2
3
4
5
6
7
8
9
10
11
12
13
14
15
16
17
18
19
20
21
22
23
24
25
26
27
28
29
30
31
32
33
34
35
36
37
38
39
40
41
|
// Setup SimpleBlobDetector parameters.SimpleBlobDetector::Params params;// Change thresholdsparams.minThreshold = 10;params.maxThreshold = 200;// Filter by Area.params.filterByArea = true;params.minArea = 1500;// Filter by Circularityparams.filterByCircularity = true;params.minCircularity = 0.1;// Filter by Convexityparams.filterByConvexity = true;params.minConvexity = 0.87;// Filter by Inertiaparams.filterByInertia = true;params.minInertiaRatio = 0.01;#if CV_MAJOR_VERSION < 3 // If you are using OpenCV 2 // Set up detector with params SimpleBlobDetector detector(params); // You can use the detector this way // detector.detect( im, keypoints);#else // Set up detector with params Ptr<SimpleBlobDetector> detector = SimpleBlobDetector::create(params); // SimpleBlobDetector::create creates a smart pointer. // So you need to use arrow ( ->) instead of dot ( . ) // detector->detect( im, keypoints);#endif |
Download code & example image
If you liked this article and would like to get more OpenCV tips, tricks, examples and tutorials in your email, sign up using the blue top bar. Some of my material is exclusive for email subscribers. My emails are meant for beginners and intermediate level OpenCV programmers who want to learn more.
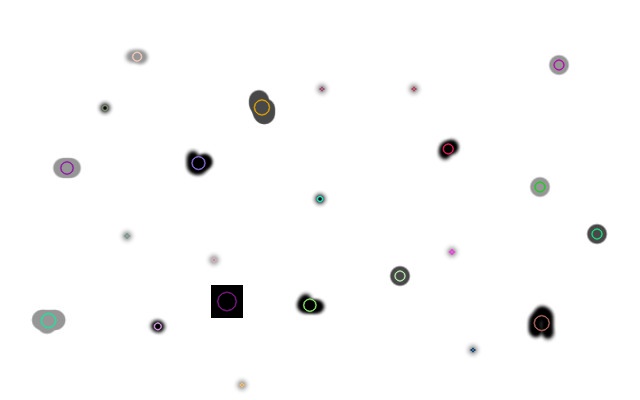
Click OpenCV blob detector to download code (C++, Python, and example image) from GitHub. The image included in the download link can be used to test various parameters, as shown below.

![[转]CVPR 2015 OpenCV 3.0 tutorial!-李逍遥说说](http://brightguo.com/wp-content/uploads/2015/06/OpenCV-Tutorial-CVPR-2015-0-195x150.png)